JNI + JAR + Applet (+ Cygwin) HOWTO
1) Accessing a DLL from Java using the Java Native Interface (JNI),
2) Loading an DLL from a Java Archive (JAR) File, and
3) Allowing an Applet to access the filesystem.
This might not seem to be a difficult taks, but normally a DLL can only be loaded as a file from the filesystem and writing to a file from an Applet is normally prohibited. A complicating factor is using the GNU gcc compiler in the Cygwin package to create a DLL.
But why would someone want to do this?
Several reasons come to mind. First of all it might be needed to call OS functions, for example to access a serial device, a smart card reader or a printer with special functions. Secondly, these functions might be required to be used via a Web based GUI. This kind of GUI has two strong points: an easy and powerfull way to make a nice GUI and central maintenance of the application. And lastly, installation of libraries on every client PC might be unwanted. Especially considering bug fixes of the libraries for large number of clients.
This all can be achieved with the solution described here. The solution is illustrated using a simple example using a message box from inside the DLL. Click here for a preview of the end result.
Prerequisites
- Java SDK
- C Compiler
- Web Browser
- Microsoft Windows
| The J2SE 5.0 Develepment Kit from SUN is used to test the example code. | ||
| The Cygwin package with the GNU gcc compiler is used to compile the DLL. The Cygwin package is a freeware Windows port of the GNU software. | ||
| The example is tested with IE6.0, but it should also work with other browsers. | ||
| The example is tested on Windows 2000 and on Windows XP. |
Accessing a DLL from Java using JNI
The first task is to write a DLL that can be accessed from a Java class. The source files for this task can be downloaded here.Step 1: The Java class
The first step is to write the Java class:
    //File: HelloPopup.java
    public class HelloPopup {
        public native void sayHello();

        static {
            System.loadLibrary("HelloPopup");
        }

        public static void main(String[] args) {
            HelloPopup h = new HelloPopup();
            h.sayHello();
        }
    }
This class has only one native method 'sayHello' with no arguments or
return value. The implementation of this method will reside in the DLL we
are going to write in the third step.The DLL must be explicitly loaded with eiter 'System.loadLibrary' method as shown or the 'System.load' method which will be used in the other tasks. The difference is that the former method expects the DLL in the search path and the latter expects a fully qualified filename including path.
The 'main' method is used to test the class.
The Java class can be compiled like any other Java class with:
javac HelloPopup.java
Step 2: Create the header file
The next step is to create the header file for the DLL containing the native methods that are declared in the Java class.The header file can be generated with the Java C Header and Stub File Generator:
javah -classpath . -jni -o HelloPopup.h HelloPopup.javaThis will generate the following header file:
    /* DO NOT EDIT THIS FILE - it is machine generated */
    #include <jni.h>
    /* Header for class HelloPopup */

    #ifndef _Included_HelloPopup
    #define _Included_HelloPopup
    #ifdef __cplusplus
    extern "C" {
    #endif
    /*
     * Class:     HelloPopup
     * Method:    sayHello
     * Signature: ()V
     */
    JNIEXPORT void JNICALL Java_HelloPopup_sayHello
      (JNIEnv *, jobject);

    #ifdef __cplusplus
    }
    #endif
    #endif
This header file contains a single function declaration for the 'sayHello'
method. The function name consists of the fully qualified class name
combined with the method name, prefixed with Java_.Step 3: Create the C source file
The next step is to implement the C funtion:
//File: HelloPopup.c
#include <basetyps.h>
#include <jni.h>
#include "HelloPopup.h"
#include <windows.h>
/*
* Class: HelloPopup
* Method: sayHello
* Signature: ()V
*/
JNIEXPORT void JNICALL Java_HelloPopup_sayHello
(JNIEnv *env, jobject obj)
{
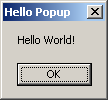
MessageBoxA(NULL,"Hello World!", "Hello Popup", 0);
return;
}
First of all the jni.h header file and the generated header file.
need to be inluded. Note that the basetyps.h header must be included
first (or include the windows.h header first), because otherwhise the
following error will be generated while compiling:jni_md.h:16: error: parse error before "jlong"Next copy the function declaration from the generated header file. Don't forget to name the parameters. They are however not used in this example.
Finally the mandatory "Hello World!" line. This time it is implemented as a MessageBox. A printf statement would have worked also if the stdio.h header was included in stead of the windows.h header.
Step 4: Compiling the source file
The next step is to compile the source file with the GNU C compiler form the Cygwin pakage: gcc -c -I"C:\cygwin\usr\include\w32api" -I"$(JAVA_HOME)\include"
-I"$(JAVA_HOME)\include\win32" -o HelloPopup.o HelloPopup.c
The -c option tells the compiler to compile only and not to link. The -I
option specify the include directories where the compiler can search for
header files. The -o option specifies the name of the output file.If everything went OK there is now an object file called HelloPopup.o.
Step 5: Create the DLL definition file
The next step is to write the DLL definition file that tells the linker which functions to export:
    ;FILE: HelloPopup.def
    EXPORTS
    Java_HelloPopup_sayHello
Step 6: Linking the files
The next step is to link the files to create the DLL:gcc -mno-cygwin -shared -o HelloPopup.dll HelloPopup.o HelloPopup.defThe -shared option tells the linker to create a shared library i.e. a DLL. The -o option specifies the name of the output file. Note the -mno-cygwin option. That will prevent the Java VM from hanging because the cygwin1.dll is not in the path. This DLL should not be used anyhow, because that would mean installing the Cygwin package on every client PC and it can't be include in the JAR file because it is 1.8 MB.
The following warning can be ignored:
    Warning: resolving _Java_HelloPopup_sayHello by linking
        to _Java_HelloPopup_sayHello@8
This warning can be prevented by changing the DLL definition file to:
    ;FILE: HelloPopup.def
    EXPORTS
    Java_HelloPopup_sayHello=Java_HelloPopup_sayHello@8
If everything went OK there is now a DLL called HelloPopup.dll.Step 7: Testing the code
The final step is testing the code:java -classpath . HelloPopupThe result should be the following MessageBox:
Loading an DLL from a JAR File
The second task is to load the DLL from a Java Archive (JAR) File. The DLL and the its source file can be re-used from the previous task, but the Java class needs to be modified. The source files for this task can be downloaded here.Step 1: Modifying the Java class
The first step is to modify the Java class from the previous task:
    //File: HelloPopup.java
    import java.net.URL;
    import java.io.InputStream;
    import java.io.File;
    import java.io.FileOutputStream;

    public class HelloPopup {
        /** The JNI method to the DLL */
        public native void sayHello();

        /** Load the library from the JAR file */
        static {
            try {
                /* Get DLL from JAR file */
                URL res = HelloPopup.class.getResource("HelloPopup.dll");
                InputStream is = res.openStream();

                /* Define the destination file */
                File dll = File.createTempFile("HelloPopup",".dll");

                /* Open the destination file */
                FileOutputStream fos = new FileOutputStream(dll);

                /* Copy the DLL fro the JAR to the filesystem */
                byte[] array = new byte[1024];
                for(int i=is.read(array);
                    i!=-1;
                    i=is.read(array)
                ) {
                    fos.write(array,0,i);
                }

                /* Close all streams */
                fos.close();
                is.close();

                /* Load the DLL from the filesystem */
                System.load(dll.getAbsolutePath());
            }
            catch(Throwable e)
            {
                e.printStackTrace();
            }
        }

        /** Command-line main for testing */
        public static void main(String[] args) {
            HelloPopup h = new HelloPopup();
            h.sayHello();
        }
    }
The major change is copying the DLL from the JAR file to a temporary file.
To achieve this an input stream is created from the DLL in JAR file (i.e.
from the same resource as the HelloPopup class is loaded), creating an
output stream to a temporary file and then copying the input stream to the
output stream. This will create a file in the temporary directory in the
form HelloPopupddddd.dll.Each time an instance of the class is made a new temporary file is created. This may not always be desirable. This can be solved by creating the file like this:
    File dll = new File(System.getProperty("java.io.tmpdir"),
            "HelloPopup.dll");
However, this could cause errors if the file already exists. The file may
already be in use (in which case it is probably not allowed to overwrite
the file) or it is an older version of the DLL. Both issues can be solved
by checking if the file already exists and including a version number in
the filename. For this example it more illustrative to use a temporary
file because it is easy to see that every time the example is run a new
file is created.After writing the DLL to the file system it must be loaded. This time the 'System.load' method with the full qualified filename must be used, because the temporary directory is normally not in the environment search path.
The Java class can again be compiled like any other Java class with:
javac HelloPopup.java
Step 2: Create the JAR file
The next step is to create the JAR file containing the class file and the DLL. The JAR file is easy to create:jar cf HelloPopup.jar HelloPopup.class HelloPopup.dll
Step 3: Testing the code
The final step is testing the new JAR file:java -classpath HelloPopup.jar HelloPopupEach time the class is run a new temporary file is created. This can be verified with:
dir %TMP%\*.dll
Allowing an Applet to access the filesystem
The third and last task is allowing an applet to write the DLL to the filesystem. This is not as difficult as it sounds. It is a matter of signing the JAR file. The source files for this task can be downloaded here.Step 1: Creating the Java applet
The first step is to create a simple Java applet:
    //File: HelloApplet.java
    import javax.swing.JApplet;
    import javax.swing.JLabel;

    public class HelloApplet extends JApplet {
        public void init() {
            HelloPopup h = new HelloPopup();
            h.sayHello();

            getContentPane().add(new JLabel("Hello Applet"));
        }
    }
The code is simular the the main of the HelloPopup class, except for the
additional text label.The Java class can also be compiled like any other Java class with:
javac HelloApplet.java
Step 2: Create the JAR file
The next step is to create the JAR file containing both class files and the DLL. The JAR file is just as easy to create as for the previous task:jar cf HelloPopup.jar HelloPopup.class HelloPopup.dll HelloApplet.class
Step 3: Create the signing key
The next step is to create the key to sign the JAR file with:
    keytool -genkey -keystore HelloPopup.keystore -alias signkey
        -keypass password -storepass password -keyalg RSA -validity 365
        -dname "CN=John Doe, OU=Development, O=ACME"
The key is given the name (i.e. alias) "signkey" and stored in a keystore
with the name "HelloPopup.keystore". Both the key and the store are given
the same password. It is a RSA key with a validity period of 365 days.
Finally a distiguished name is given to the key specifying the common name
(CN), the Organizational Unit (OU) and the Organization (O). This is
format that can be understood by other applications.Normally the generated key would be signed by a trusted third party, but that is not neccessary for this example.
Step 4: Signing the JAR file
The next step is to sign the JAR file with the key generated in the previous step: jarsigner -keystore HelloPopup.keystore -storepass password
-keypass password HelloPopup.jar signkey
Step 5: Creating the HTML file
The next step is to create a web page to display the applet in. A very simple page will do:
    <!-- File: HelloApplet.html -->
    <html>
      <head>
        <title>Hello Applet</title>
      </head>
      <body>
        <APPLET CODE    = "HelloApplet"
                ARCHIVE = "HelloPopup.jar"
                WIDTH   = "100"
                HEIGHT  = "50"
        ></APPLET>
      </body>
    </html>
Actually this page is to simple, because it does not gaurantee the applet
will work on every browser. For example it does not tell which version
of java the applet needs. This can be solved by using the Java Plug-in
HTML Converter:htmlconverter HelloApplet.htmlNote: The origional file will be backed-up.
Step 6: Testing the code
The final step is testing the code. Opening the web page in a browser (e.g. by double clicking on the file) should be show the following warning: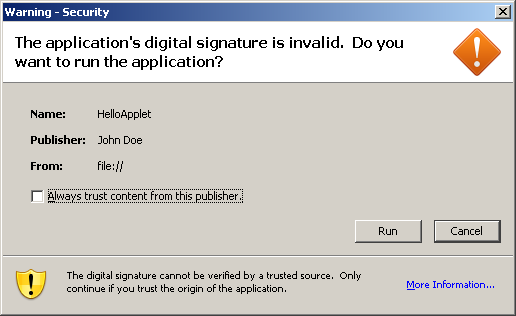
The signature is invalid because the key was not signed by a trusted third party, otherwise the warning would have been if the applet was allowed to run. By clicking on run button the applet is granted permission to access the file system.
The result should be the MessageBox again:
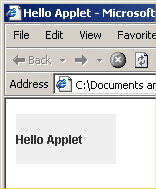
After clicking on the OK button of the MessageBox, the rest of the applet is shown:
If the signature warning was canceled the following error would have been shown in the java console:
java.lang.SecurityException: Unable to create temporary file
Conclusion
That's it!Of course this howto only scratches the surface of the Java Native Interface, signing Java Archive files or applet writing.
You're on your own now...